
先日、MacBook Proローカルで、Flux.1 dev + Comfyuiを動かしてみましたが、今度はFlux.1 devに対応したLoRAやControlNetを動かしてみました。
LoRA
公開されているLoRAへの対応は比較的簡単です。huggingfaceやcivitaiなどで、Flux dev対応のLoRAを検索して、
comfy.git/app/models/loras に配置します。
次にworkflowとして、下記などをダウンロードして、Comfyuiに読み込みます。
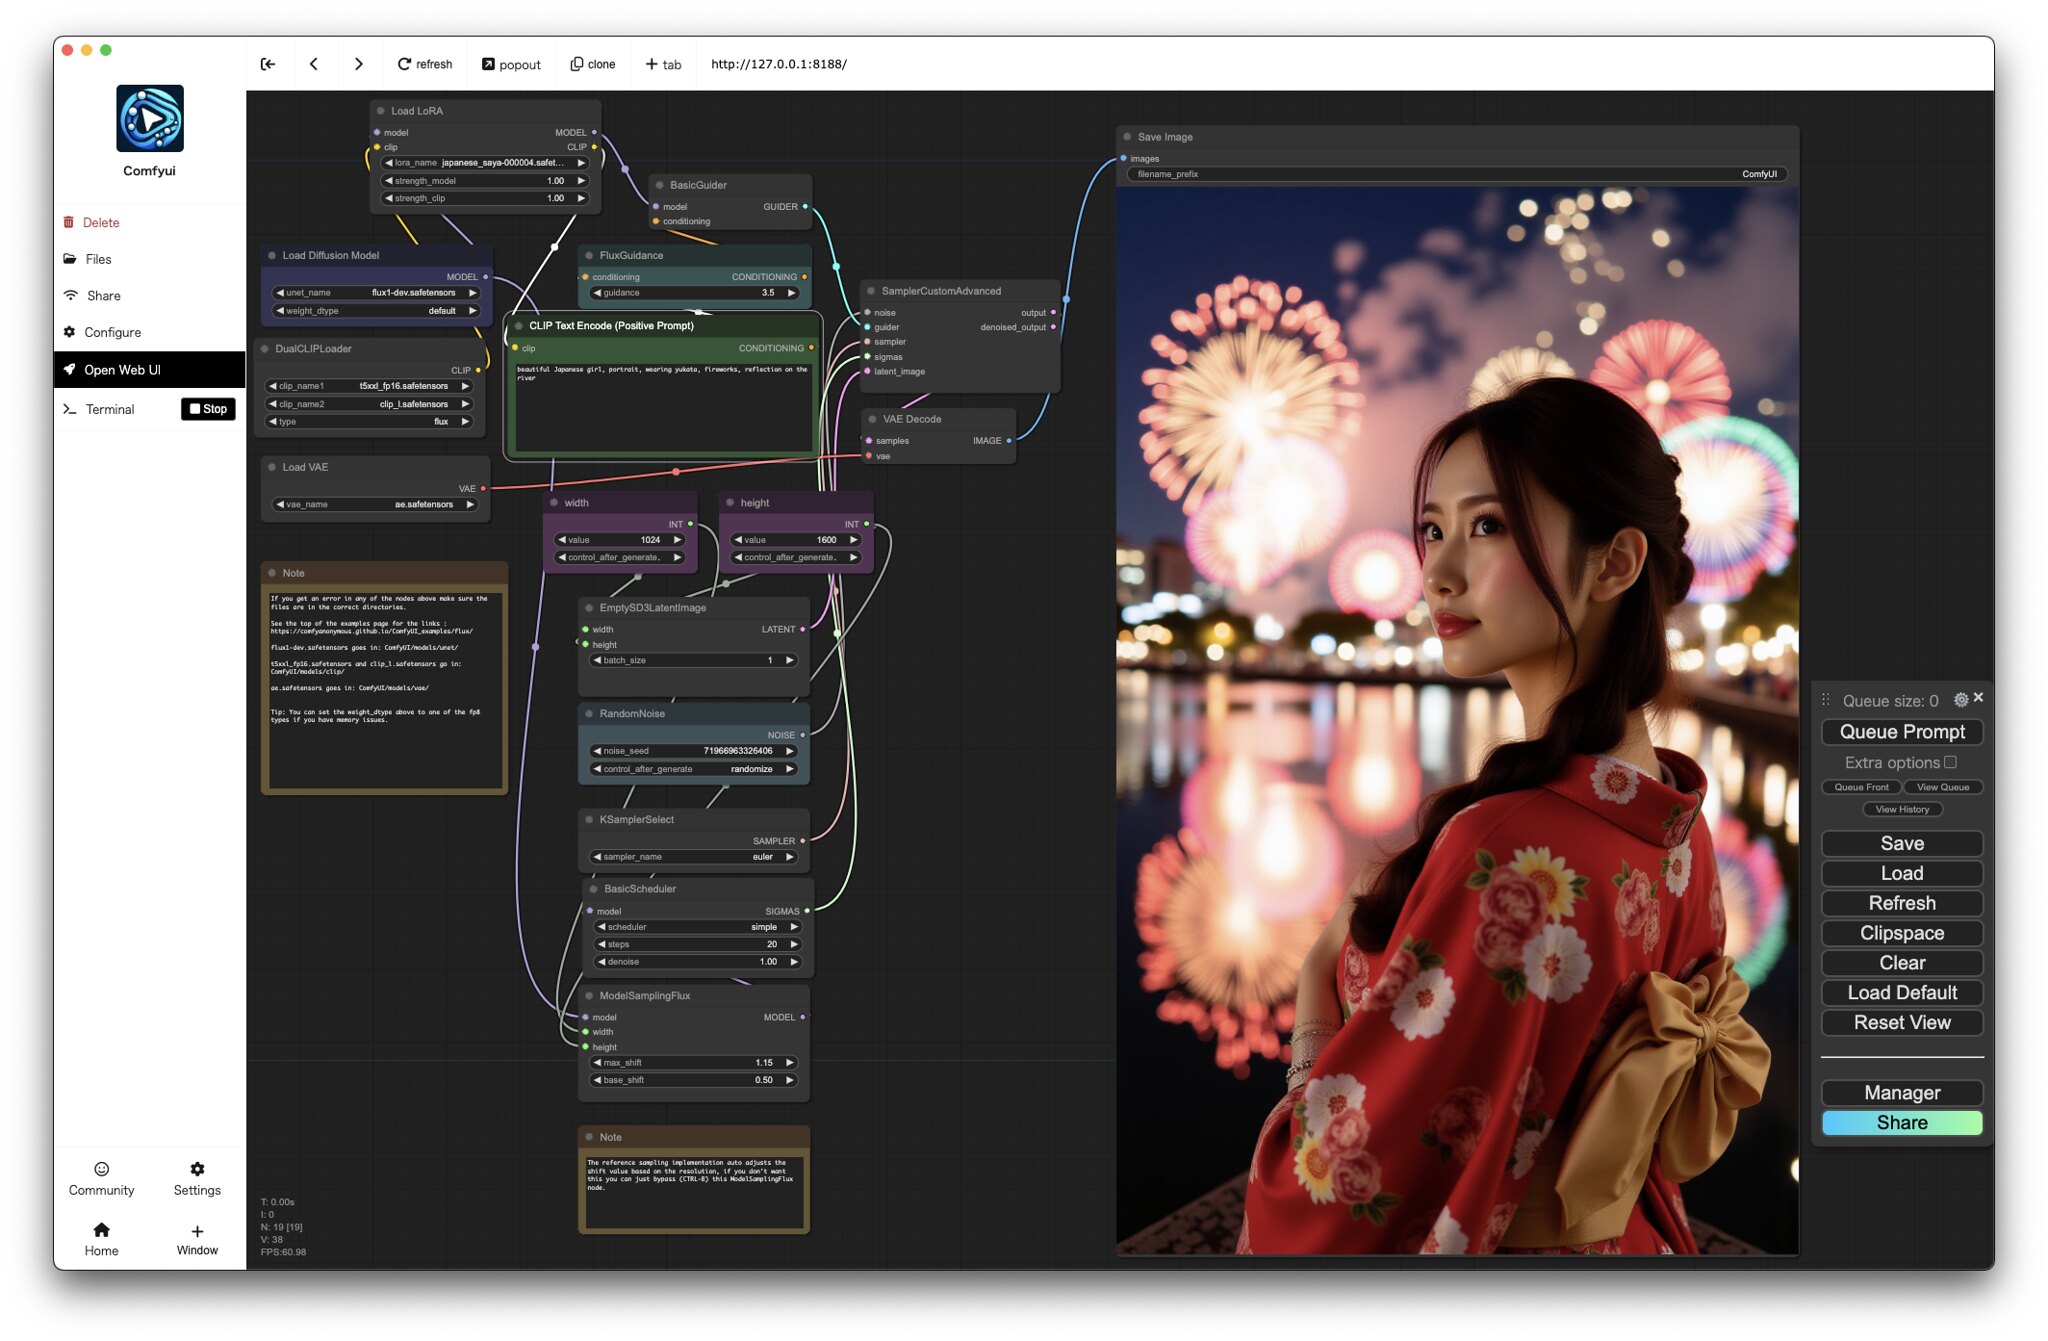
Load LoRAが追加されているので、lora_nameのところを好きなLoRAに変更して実行します。
https://huggingface.co/alfredplpl/flux.1-dev-modern-anime-lora/blob/main/anime-workflow.json
まだあまりありませんが、ポートレート用に使えそうなLoRAを試してみました。
Asir Asian Portrait Photography Flux
https://civitai.com/models/647255/asir-asian-portrait-photography-flux

school uniformを指定しても、実写風の画像が生成できました。

Fluxではアニメ調になってしまったラーメンを食べる姿も実写風に。
japanese_saya
https://civitai.com/models/650848/japanesesaya

こちらはより日本人風に。

2人とかもしっかり表現できますね。
ControlNet
ControlNetなども絶賛対応中の模様でしたが、下記で、Canny, Depth, HED, IP AdapterなどのControlNetが公開されていたので、動かしてみました。(2024-08-27のVer.でなんとか動きました)
https://github.com/XLabs-AI/x-flux-comfyui

ComfyuiのManagerから、Custom Nodes Managerをクリックします。
x-fluxを検索したら、x-flux-comfyui が出てくるのでInstallします。

Check Missingで、ComfyUI’s ControlNet Auxiliary Preprocessors が出てきたのでこれもInstall。
IP Adapter

下記から model.safetensors をダウンロードして、comfy.git/app/models/clip_vision に配置。
https://huggingface.co/openai/clip-vit-large-patch14/tree/main
下記から、flux-ip-adapter.safetensors をダウンロードして、comfy.git/app/models/xlabs/ipadapters に配置
ip_adapter_workflow.json をダウンロードして、ワークフローとして使います。
https://huggingface.co/XLabs-AI/flux-ip-adapter/tree/main
Mac用修正
これだけだとMacの場合エラーが出たので、下記を修正しました。(そのうち修正されると思いますが)
comfy.git/app/custom_nodes/x-flux-comfyui/nodes.py
        if torch.backends.mps.is_available():
            device = torch.device("mps")
        if torch.cuda.is_bf16_supported():
            dtype_model = torch.bfloat16#
        else:
            dtype_model = torch.float16#
の部分を下記に変更
        if torch.backends.mps.is_available():
            device = torch.device("mps")
            dtype_model = torch.bfloat16#
        elif torch.cuda.is_bf16_supported():
            dtype_model = torch.bfloat16#
        else:
            dtype_model = torch.float16#
comfy.git/app/custom_nodes/x-flux-comfyui/xflux/src/flux/math.py
scale = torch.arange(0, dim, 2, dtype=torch.float64, device=pos.device) / dimを下記に変更
scale = torch.arange(0, dim, 2, dtype=torch.float32, device=pos.device) / dimさらに、Flux 1 devのモデルが、flux1-dev.safetensors だとメモリ不足?で落ちたので、Download Modelsから Flux2 Dev gguf q4_0 をダウンロード。comfy.git/app/models/unet に flux1-dev-Q4_0.gguf がダウンロードされます。
Custom Nodes Managerで、ComfyUI-GGUFをInstallします。
workflowの Load Diffusion Model を、Unet Loader (GGUF)に差し替えて、unet_nameにflux1-dev-Q4_0.ggufを指定して実行。
これでやっと動きました。(とっても遅いし、ちゃんとプロンプト通りになってない感じがしますが)
Canny
下記から、flux-canny-controlnet-v3.safetensors をダウンロードして、 comfy.git/app/models/xlabs/controlnets に配置。
ワークフローもダウンロードして、Unet Loader (GGUF)に差し替えて実行。(上記Mac用修正が必要)
https://huggingface.co/XLabs-AI/flux-controlnet-canny-v3/tree/main

Depth
下記から、flux-depth-controlnet-v3.safetensors をダウンロードして、 comfy.git/app/models/xlabs/controlnets に配置。
ワークフローもダウンロードして、Unet Loader (GGUF)に差し替えて実行。(上記Mac用修正が必要)
https://huggingface.co/XLabs-AI/flux-controlnet-depth-v3/tree/main

HED
下記から、flux-hed-controlnet-v3.safetensors をダウンロードして、 comfy.git/app/models/xlabs/controlnets に配置。
ワークフローもダウンロードして、Unet Loader (GGUF)に差し替えて実行。(上記Mac用修正が必要)
https://huggingface.co/XLabs-AI/flux-controlnet-hed-v3/tree/main

とりあえず動作確認だけで、まだ使っていません…。
関連投稿:
 Comfyui+FLUX.1 で img2img (Florence2), LoRA, FaceDetailer, Ultimate SD Upscaleなどが簡単に使える Tenofas’ modular FLUX Workflow
 進化した画像生成AI Flux.1 + Comfyui を pinokio で Macローカルに簡単インストール ポートレート作成してみました #Flux #Mac
 最新実写美少女モデル #BRAV5 と イラストモデル #AnythingV4 の併用による AIコスプレ写真 と #DepthLib での手の補正 #StableDiffusion #LoRA #ControlNet #コスプレ
 Stable Diffusionの画像生成をLCMやADDで高速化 LCM LoRA や SDXL Turbo LoRA で ステップ数を大幅削減
ピンバック: Looking Glass Go に AI美女ホログラム を表示してみました #LookingGlassGo #Mac #Comfyui #Marigold | Digital Life Innovator
ピンバック: 2024年 よく読まれた記事ベスト10 と よく観られた動画ベスト10 | Digital Life Innovator