
以前、Intel Core Ultra 7 258V 搭載 AI PC(Intel Core Ultra 7 258V 内蔵GPU Intel Arc 140V 16GB) で IntelのAI Playgroundでのローカル画像生成や動画生成を試しましたが、その続きでAI PlaygroudでのFlux.1での画像生成や、FramePackを改造してIntel Arc GPUで動かしてみるなんてことをやってみたので、書いておきます。
AI Playgroud

AI Playgroundの画像生成のワークフローにFlux.1-Schnell Mid Qualityというのがあるので、こちらを選んで画像生成を行うと、モデルがダウンロードされ、Flux.1を使った画像生成ができます。一部huggingfaceのtokenを入れないとダウンロードできないモデルがあるので、設定でトークンを入れます。(トークンはhuggingfaceにサインインして、https://huggingface.co/settings/tokensで作成します)

大きなモデルのダウンロードが途中で失敗すると次からエラーになってダウンロードできなくなるというのに悩まされましたが、モデルは下記にあることが分かったので、対応するフォルダを削除すればダウンロードできるようになりました。
¥User¥(Username)¥AppData¥Programs¥AI Playground¥resources¥ComfyUI¥models
Flux.1-Schnellで作成してみた画像

画像から動画は、Video-Img2Vid LTX Video を選び、画像を選ぶを押して、先程の画像を読み込んで、生成することができます。

生成はとても速いのですが、やはりちょっと崩れがちなのが気になりますね。
FramePack
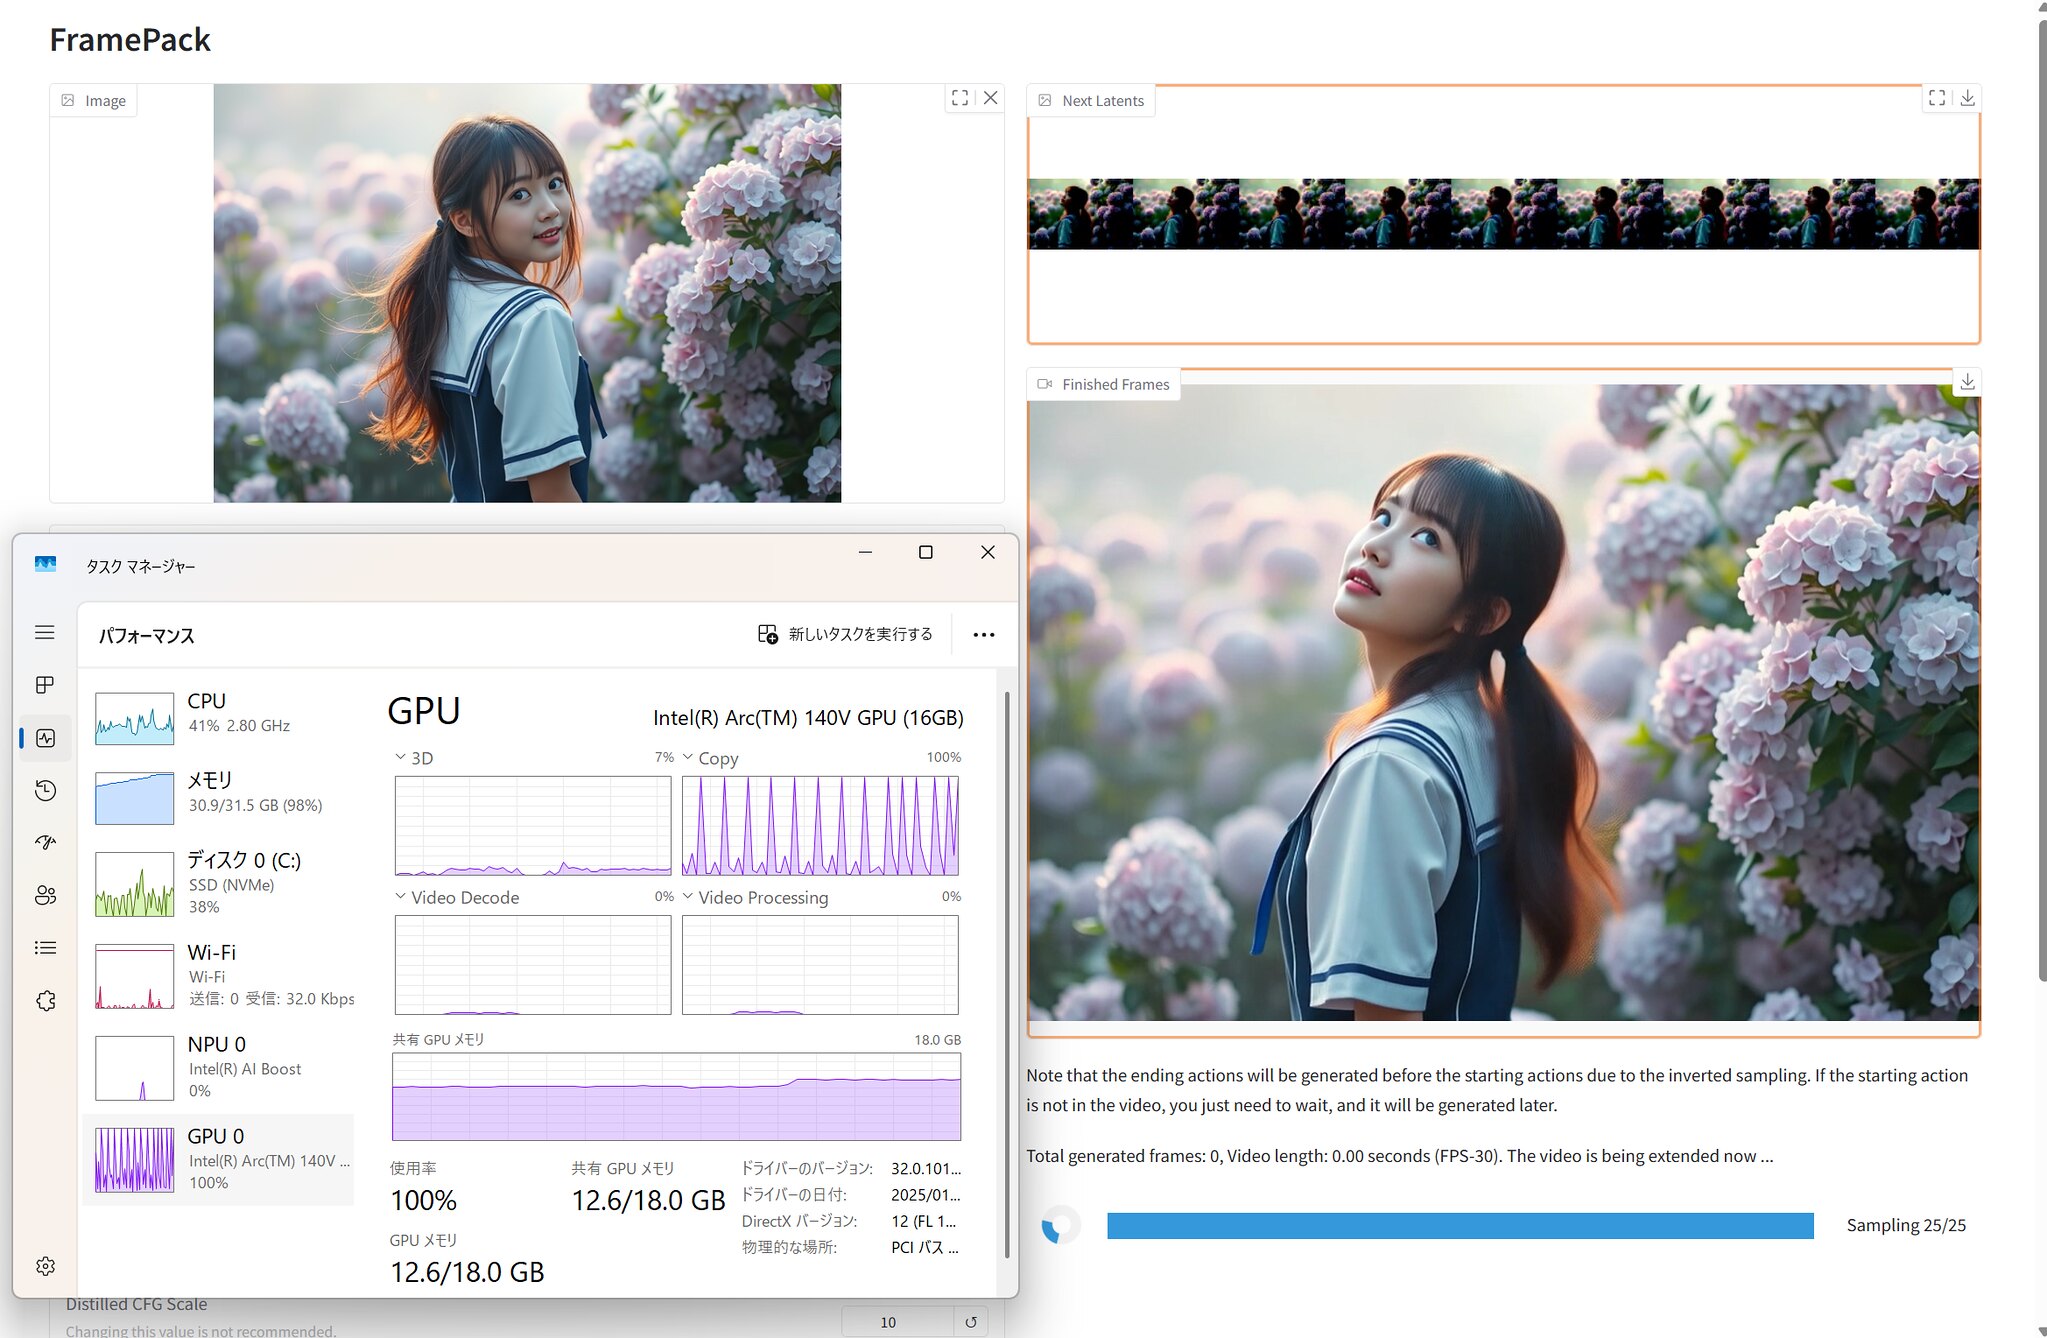
クオリティの高い動画を生成することができるFramePackをNVIDIAのGPU非搭載のAI PCで動かせるか試してみました。
Intel Extension for PyTorchを使って、無理やり対応させる方法です。
まずは、Git for Windowsをダウンロード、インストールします。Git Bashで下記を実行して、FramePackのリポジトリをクローン。
git clone https://github.com/lllyasviel/FramePack.git次に、Miniforgeをダウンロードして、インストールします。Miniforge Promptを実行して、下記を実行します。
cd FramePack
conda create -n cp311_libuv python=3.11 libuv
conda activate cp311_libuv
conda install libuv下記を参考にIntel Extension for PyTorchをインストールします。
https://pytorch-extension.intel.com/installation?platform=gpu&version=v2.6.10%2Bxpu&os=windows&package=pip
# For Intel® Core™ Ultra Series 2 Mobile Processors (Arrow Lake-H), use the commands below:
python -m pip install torch==2.6.0.post0+xpu torchvision==0.21.0.post0+xpu torchaudio==2.6.0.post0+xpu --extra-index-url https://pytorch-extension.intel.com/release-whl/stable/arl/us/
python -m pip install intel-extension-for-pytorch==2.6.10+xpu --extra-index-url https://pytorch-extension.intel.com/release-whl/stable/arl/us/
FramePackに必要なライブラリをインストールします。
pip install -r requirements.txtdiffusers_helper/memory.py を 書き換えます。(とりあえず動くように適当に変更しているだけなので、CUDAでは動かなくなります)
import torch

cpu = torch.device('cpu')
gpu = torch.device(f'cuda:{torch.cuda.current_device()}')
gpu_complete_modules = []
↓
import torch
import intel_extension_for_pytorch as ipex

cpu = torch.device('cpu')
gpu = torch.device(f'xpu:{torch.xpu.current_device()}')
gpu_complete_modules = []
def get_cuda_free_memory_gb(device=None):
if device is None:
device = gpu
memory_stats = torch.cuda.memory_stats(device)
bytes_active = memory_stats['active_bytes.all.current']
bytes_reserved = memory_stats['reserved_bytes.all.current']
bytes_free_cuda, _ = torch.cuda.mem_get_info(device)
bytes_inactive_reserved = bytes_reserved - bytes_active
bytes_total_available = bytes_free_cuda + bytes_inactive_reserved
return bytes_total_available / (1024 ** 3)↓
def get_cuda_free_memory_gb(device=None):
    if device is None:
        device = gpu

    allocated = torch.xpu.memory_allocated(device) / (1024 ** 3)
    free_memory_gb = 10 - allocated
    return free_memory_gb
xpuのフリーメモリの取得方法がわからなかった(うまく動作しなかった)のでここはかなり適当に。
free_memory_gb = 10 – allocated の 10 は、もう少し大きな数字にしても大丈夫だけど、大きくしすぎるとメモリ不足で落ちます。
あと、ファイル中に複数個所ある下記を書き換えます。
torch.cuda.empty_cache()↓
torch.xpu.empty_cache()たぶん変更したのはこれだけだと思います。(試行錯誤していたので自信なし…)
python demo_gradio.py --server 127.0.0.1 --inbrowserこれで起動して、ブラウザでUIが立ち上がります。

オプションなどは変更せずにそのまま実行。画像サイズのオプションとかなくなった?
先ほど設定した数値(10)+3〜4GBのGPUメモリで処理が実行されいます。
残念ながら、スピードはかなり遅く、5分の動画を生成するのに3時間以上かかりました…。でも、同じ画像・同じプロンプトで、結果はLTX Videoに比べてかなり良い感じです。

HP公式オンラインストア:HP OmniBook X Flip 14-fm
26周年大祭り開催中(6/20~7/31)